How to Submit and Manage Blog Posts
Write a submission, format with Markdown, submit for review, and track your review status.
Who can submit
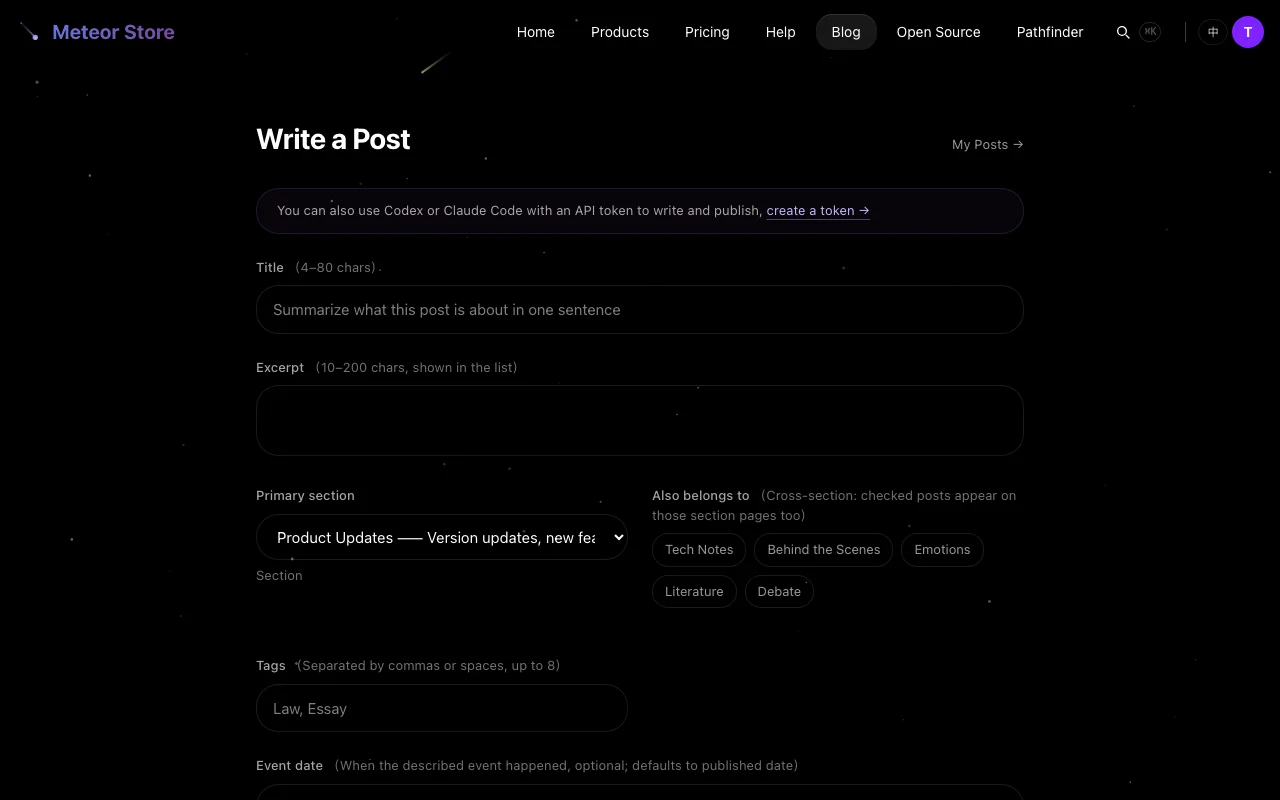 Any user with a registered and email-verified account can submit articles to the Meteor Store blog. Reader submissions appear in the same blog listing as the store owner's articles and are publicly visible once approved.
Before submitting, make sure your article's topic fits one of the blog's six sections. If you are unsure, browse the existing articles in each section to see where your topic belongs.
How to submit a new article
- Log in, then click "Submit Article" in the user menu, or go directly to
/blog/submit. - Fill in the submission form:
- Title — Clear and concise. Readers should know what the article is about at a glance.
- Section — Pick a primary section from the dropdown. The article will appear on that section's listing page first. You can also add secondary sections so the article shows up in multiple section pages.
- Body — Write in Markdown. Standard syntax is supported: headings, lists, links, code blocks, and so on. A live preview is available in the editor.
- Excerpt — A one- or two-sentence summary. This appears on the article card in listing pages.
- Tags — Separate multiple tags with commas or spaces. Maximum 8 tags. Tags help readers discover your article by keyword.
- Event date (optional) — If the article documents a specific event, you can add the date it occurred.
- Choose either "Save Draft" or "Submit for Review."
- Save Draft: The article status becomes "Draft." Only you can see it; it does not enter the review queue.
- Submit for Review: The article status becomes "Pending," and the admin will see it in the review queue.
Raw HTML in the body is stripped by the security filter — only standard Markdown syntax is rendered. This keeps every article safe.
The review process
Submissions follow this status flow: Draft → Pending → Published / Rejected.
- Draft — Visible only to you. You can edit or submit for review at any time. Drafts have no time limit.
- Pending — In the admin's review queue. You can still edit the article while it is pending, but editing resets the status back to "Draft" — you'll need to re-submit for review. This prevents content from changing unexpectedly during the review.
- Published — Approved by the admin. The article is publicly visible to all visitors. You can still edit a published article; editing resets it to "Draft" and you must re-submit.
- Rejected — The admin determined the article does not meet publication standards. A brief rejection note may be included. You can revise based on the note and re-submit.
There is no fixed review turnaround time — it depends on the admin's schedule. If your article has been pending for several days with no status change, you can politely remind the store owner through the feedback page.
Viewing and managing your articles
From the user menu in the navigation bar, click "My Posts" to go to /blog/my-posts. This page lists every article you have ever submitted, ordered by last update time.
Each article card shows:
- Title and current status (Draft, Pending, Published, Rejected).
- Excerpt and tags.
- Creation time and last update time.
Rejected articles include a rejection note if one was provided. Click the article to open the editor, make changes, and re-submit.
Tips for getting your submission approved
These suggestions are based on common rejection reasons. Reviewing them before submission significantly improves your chances:
- Pick the right section — Tech writing goes in "Tech Notes," essays in "Literature." The "Product Updates" section does not accept reader submissions — that section is for the store owner's release notes.
- Write your own content — Do not copy others' work. Do not submit AI-generated text without thorough human review. Your byline means you stand behind your words.
- No pure promotion — If the primary purpose of your article is to promote a product, service, or link rather than share insight or experience, it will likely be rejected.
- Title and body should match — Deliver on what the title promises. Clickbait titles get rejected.
- Tag reasonably — Use tags that are actually relevant to your content. Don't stuff unrelated tags for visibility. Maximum 8 tags.
- Break up long paragraphs — Walls of text are hard to read on screen. Use headings and paragraph breaks thoughtfully.
How reader submissions differ from owner articles
Reader submissions and the store owner's original articles are treated largely the same in how they appear — same blog listing, same rendering pipeline, same RSS output. The differences are:
- Source — Owner articles come from Markdown files in a Git repository. Reader submissions live in the database.
- Author credit — Owner articles end with a fixed handwritten-style signature ("Meteor"). Reader submissions end with the author's avatar, nickname, and bio.
- Editing — The owner edits articles through GitHub. Readers edit through the submission page on the site.
- Reporting — Reader submissions can be reported. Owner articles do not go through the report flow.
- URL format — Owner articles are at
/blog/{slug}. Reader submissions are at/blog/p/{id}.
Related articles
How to Browse Blog Sections, Tags, and RSS
Browse blog posts by section, discover related content through tags, and subscribe via RSS.
How to Like, Comment, Bookmark, and Report Posts
Engage with blog posts: like articles, leave comments, bookmark favorites, and report inappropriate content.
Publish Blog Posts via API (Codex / Claude Code)
Create, edit, and publish blog posts via personal access tokens in Codex, Claude Code, and other tools.
Still need help?
Send us the details of your issue, including the relevant environment and error message, and we'll look into it.
Submit a question